 I've decided to join in on the "Show Us Where You Live Friday" home tour going on over at Kelly's Korner Blog, mostly because this week is children's room/nurseries, of which I have two that I am very proud to show off (and already have pictures on my computer). And as you'll see, this is Carter's room as it was originally decorated. It is now a two year old danger zone that honestly doesn't look as good in pictures. But anyway, let's get started.
Both my children used the same nursery furniture because I'm
But anyway, here's the boy's room, two nights before he was born, aka, the day it was finally finished. I like to plan ahead, obviously.
 For Carter's room, I wanted something boyish, but I am more into patterns, colors and textures than I am actual themes like trains or Noah's Ark, for example. Throughout the planning of this nursery, I must have shown Nick at least twenty different fabric samples that I liked, NONE of which he ever agreed to. One day, I found a twin camouflage comforter set at Wal-Mart (Kelly will be so proud), and I suddenly had a vision of how my mom and I could turn it into a fabulous nursery. The second Nick saw the camo comforter, he was in love, so that was that. We (mostly my mom) then created what you see above. [She likes to say that I'm the designer and she's the one that makes it happen. While that's mostly true, she is FANTASTIC at knowing exactly how to make my ideas come to life.]
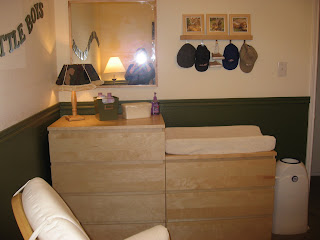
 I bought these two chest of drawers at Ikea, put them side, and Voila! a changing table is born.
 I searched for a long time for something cute to occupy this large [blank] wall, but all I could ever find that matched my color/camo theme was military related, and that wasn't really the direction I was headed. Then I came across these letters at JoAnn Fabrics and painted them the same color as the lower half of the wall, and I couldn't be happier with how they turned out. (They're still up in his room actually; perhaps I think by leaving the letters up that he WILL stay little forever.)
 Here's a better picture of the bedding that my mom made. We took the original camo twin comforter, cut out the size of a toddler quilt and then lined/bordered it with off-white chenille. The window treatment was also a standard valance that we bordered with chenille to make it say "baby" instead of "army fatigue". We used the remnants from the comfortor to make the bumper pads, a basket liner and the lampshade you see in the pic below.
 (Wish I had turned off the tv for the next picture, but oh well. Life goes on.) I had grand plans of watching tv late at night while I was nursing baby, but as it turned out, I got pretty quick at nursing him while half asleep and running back to bed as soon as I was finished. I also love the "CaRteR" letters/sign that my dear friend Jen Pendell made for me. It matched the room PERFECTLY.
And that's it for the boy.
****************************************************************
Next up is Livvy-Lou's room.
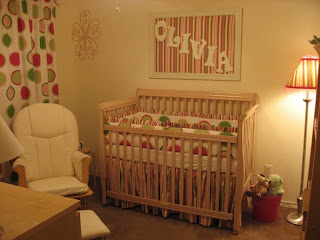
 The curtain fabric was the inspiration for this darling dwelling. Since this was our baby girl, I'll be honest, Nick didn't have much say in the fabric choices. I fell in love with the polka dot fabric the second I saw it at Hancock Fabrics and knew it would be the base for Olivia's room. I then found the stripe fabric to coordinate and LOVE how it all came together.
 Once again, I told my mom what it looked like in my mind and she made it happen. And I'm sure she'd be the first to tell you that making nursery bedding is a whole lot easier the second time around. She did a great job adding the stripe to the bumper pads and making the bedskirt completely out of stripes which looks fabulous still even now that the crib mattress is lowered.
And the framed name? Pure genius, I think. The frame was purchased (backless) from Hobby Lobby for about $20 1/2 price. I bought a foam board, covered it with fabric, and adhered the letters with double stick tape. This is probably my most favorite thing in the room.
 Covering that lampshade wasn't easy, but once we added the hot pink, feather-like trim, the shabby chic-ness (not a word, I know) impressed even me.
 My friend, Jen, the same one that made the sign for Carter's room, also made one for Olivia, perfect colors and just the right amount of frill, if you asked me, so it found a home right above her bookshelf.
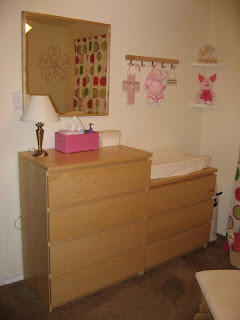
 And here we have the same Ikea chests-turned-changing-table, transitioned seamlessly into the girl's room.
Well folks, that's how we do nurseries deep in the heart of Texas (or in our household, at least). Thanks for stoppin by!

7 comments:
Oh my, your army themed room is so cute! That's such a little boys bedroom! Good job! Love the name Oliva! :)
Cute! Cute! I love the baseball caps in the boys' room!
This is the first time I'm seeing Olivia's room. I L-O-V-E it. I'm a sucker for any thing with polka dots. :)
LOVE them both! No girl decorating over here and though I did do a "theme" boy room for our first, the next one is going to be all about color and texture... SO with you there! I'm sure you'll see pics as the due date gets closer... in the process of getting "big boy" out right now so we can start fresh!
You and your mom should consider making that stuff and selling it- unique and cute, and custom costs big bucks.
So, how about this being the longest blog comment in history?!?!
This is the first time I've seen Olivia's nursery! It's so cute! You do a very good job, my friend.
Those rooms are so cute!!! I love, love, love the little details. Ok, I'm going to post Kensington's room today.
Very cool rooms. I love the lettering on the large wall in your little boys room. The polka dots and stripes are too cute in your little girls room.
Post a Comment